“Name and describe the 9 bread baking steps and what role you think bakers intuition plays in them.”- my boss.
So during this quarantine my job has been a very unusual case of still being employed and getting paid, but undetermined of how long it’s gonna stay that way. Very blessed, very happy to not have an important struggle. But this being the case with work has led to us having small writing prompts. I’m not sure who is assigning them, but they seem mostly as a way to keep us engaged with work by way of writing assignments. That one up there was the first mention of bread making, and my assignment last week. And immediately I had questions. First being, ” for what kind of bread? Does feeding the starter count as one? What about different shaping routines, and folds? What does bakers intuition mean to you?” I hope I still have a job after this.
Here’s what I turned in. But you guys get to see pictures too. 🙂
“The Nine Bread Baking Steps” showed up nowhere on my google search. Some recipes have 14 steps, and I’m fairly certain that most of our recipes at work have maybe nine sentences combined. So with that in mind, I have edited and scootched wording-wise my bread routine into nine steps. I’ve been working with this same recipe everyday for almost 2 months now. It’s not a super spectacular recipe, it changes a little all the time based on weather and available ingredients (who took all the damn rye). The bakers’ intuition role, I feel, should be present throughout making the bread as it is used mostly through a bakers’ five senses. Intuition, combined with a built relationship to one’s recipe, should be present when gathering ingredients of good quality (sight and smell). It should be present in the role of the hands that mix the flour and water together, that pull the dough from the bowl, that test the strength and build the structure and shape of the dough. Before timers we used our eyes, but also our noses to let us know when something was done. And every good baker wants to stop for a moment after the oven is off, and listen to the crackle and pop.
- Mise en Place

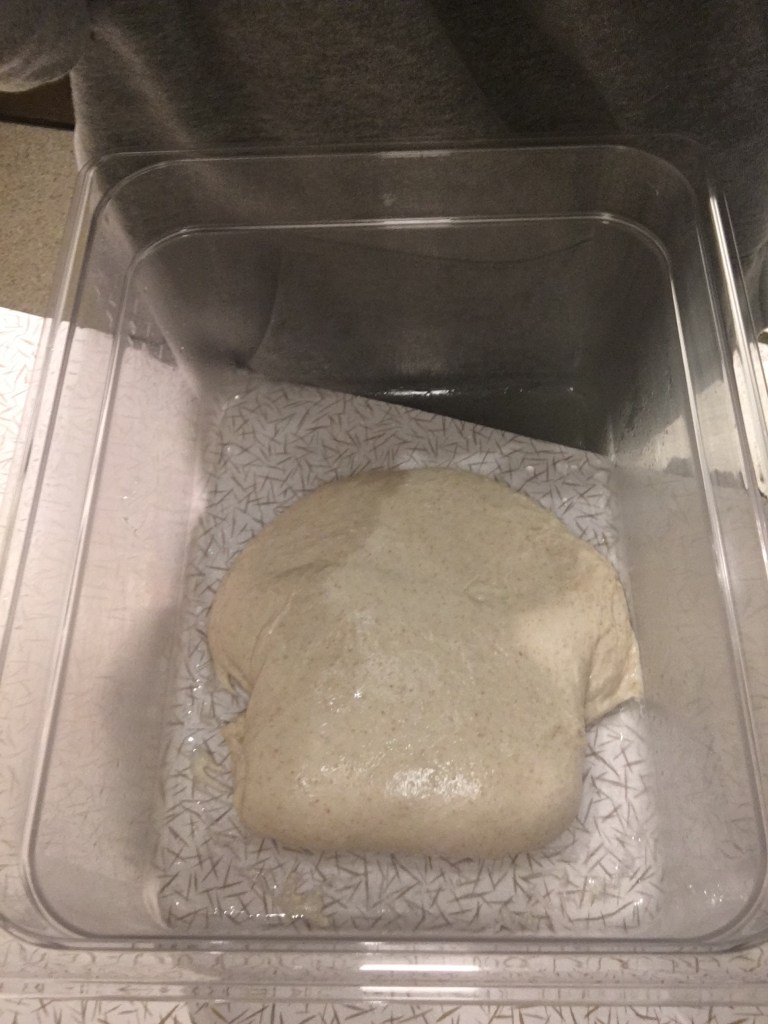
So here’s a picture of my dish rack 🙂
You ever start off so confidently on a project that you blow through the directions (we don’t need no stinkin’ directions), and it turns out the hardest part for you is just getting started? Yeah, me neither. Anyway, you really should gather all your crap first before you start hydrating your flour. And make sure that everything is fresh and in good form, cause no one likes your dead stale whole wheat nonsense.
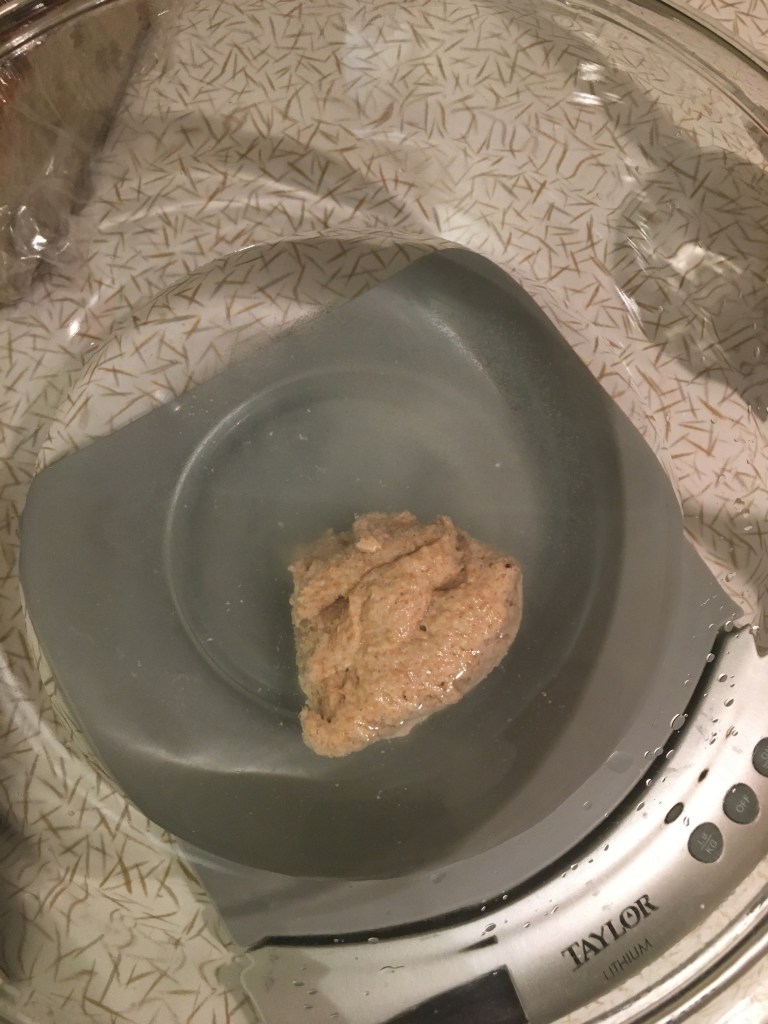
- First mix & Autolyse
Liquids in the bottom of my mixing bin (you read that right) first, in this case just water. Because my intuition reminds me that My Bitch (the name for my starter) has a sweet tooth, I throw a little bit of sugar to dissolve in the water along with said starter. And because I want that starter evenly distributed into the flour (once I introduce it), I swish my hand around in the water. Breaking up the clumps of starter and making sure it is evenly dissolved along with the sugar granules at the bottom. It usually gets bubbly looking on top and this pleases my soul.
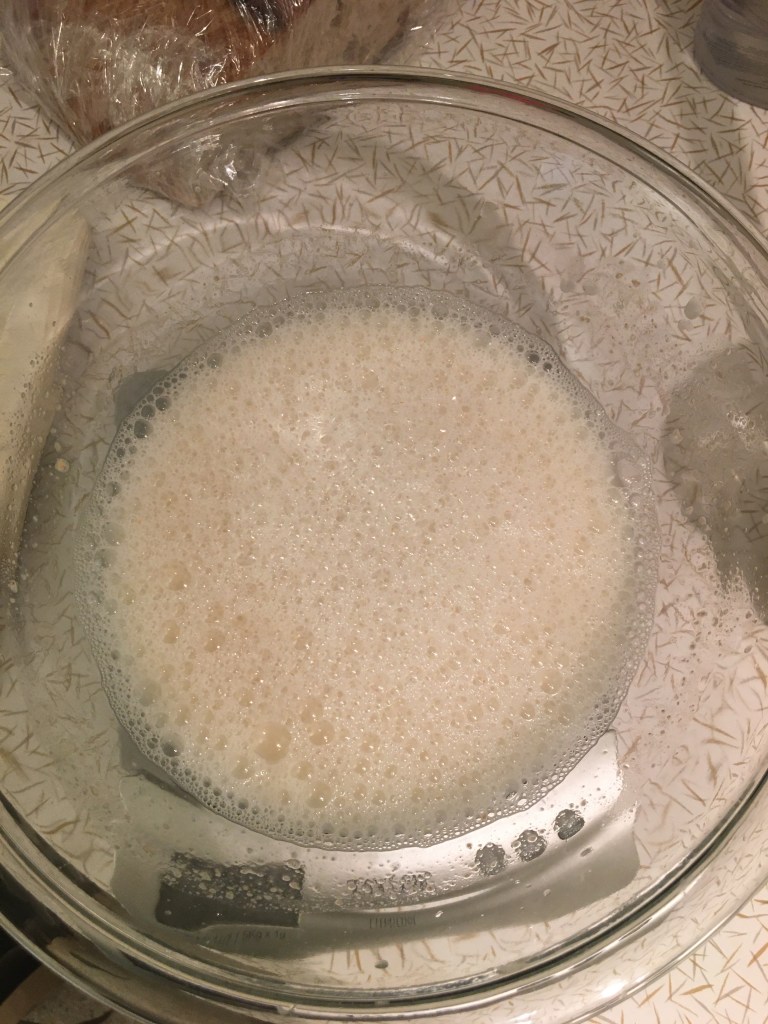
Then the flour goes in. My starter is a whole wheat starter (usually half rye when there’s not a friggin pandemic), but my loaves are overall bread flour. And mix the two together until I don’t feel any flour pockets. I also try to be a little rougher with the dough during this part, ’cause I find it helps as a first step towards building strength later on in the folds.
And we let the flour fully soak up the water and starter and begin melding into a single solid mass. For about 30 min.
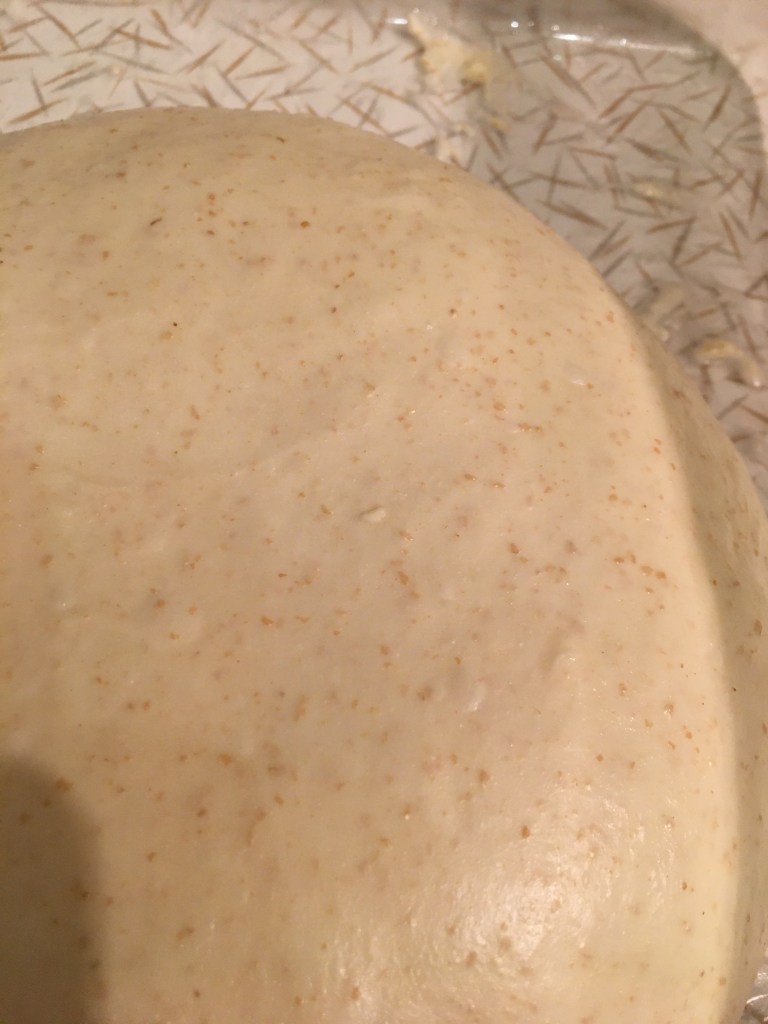
- Salt addition & bulk proof
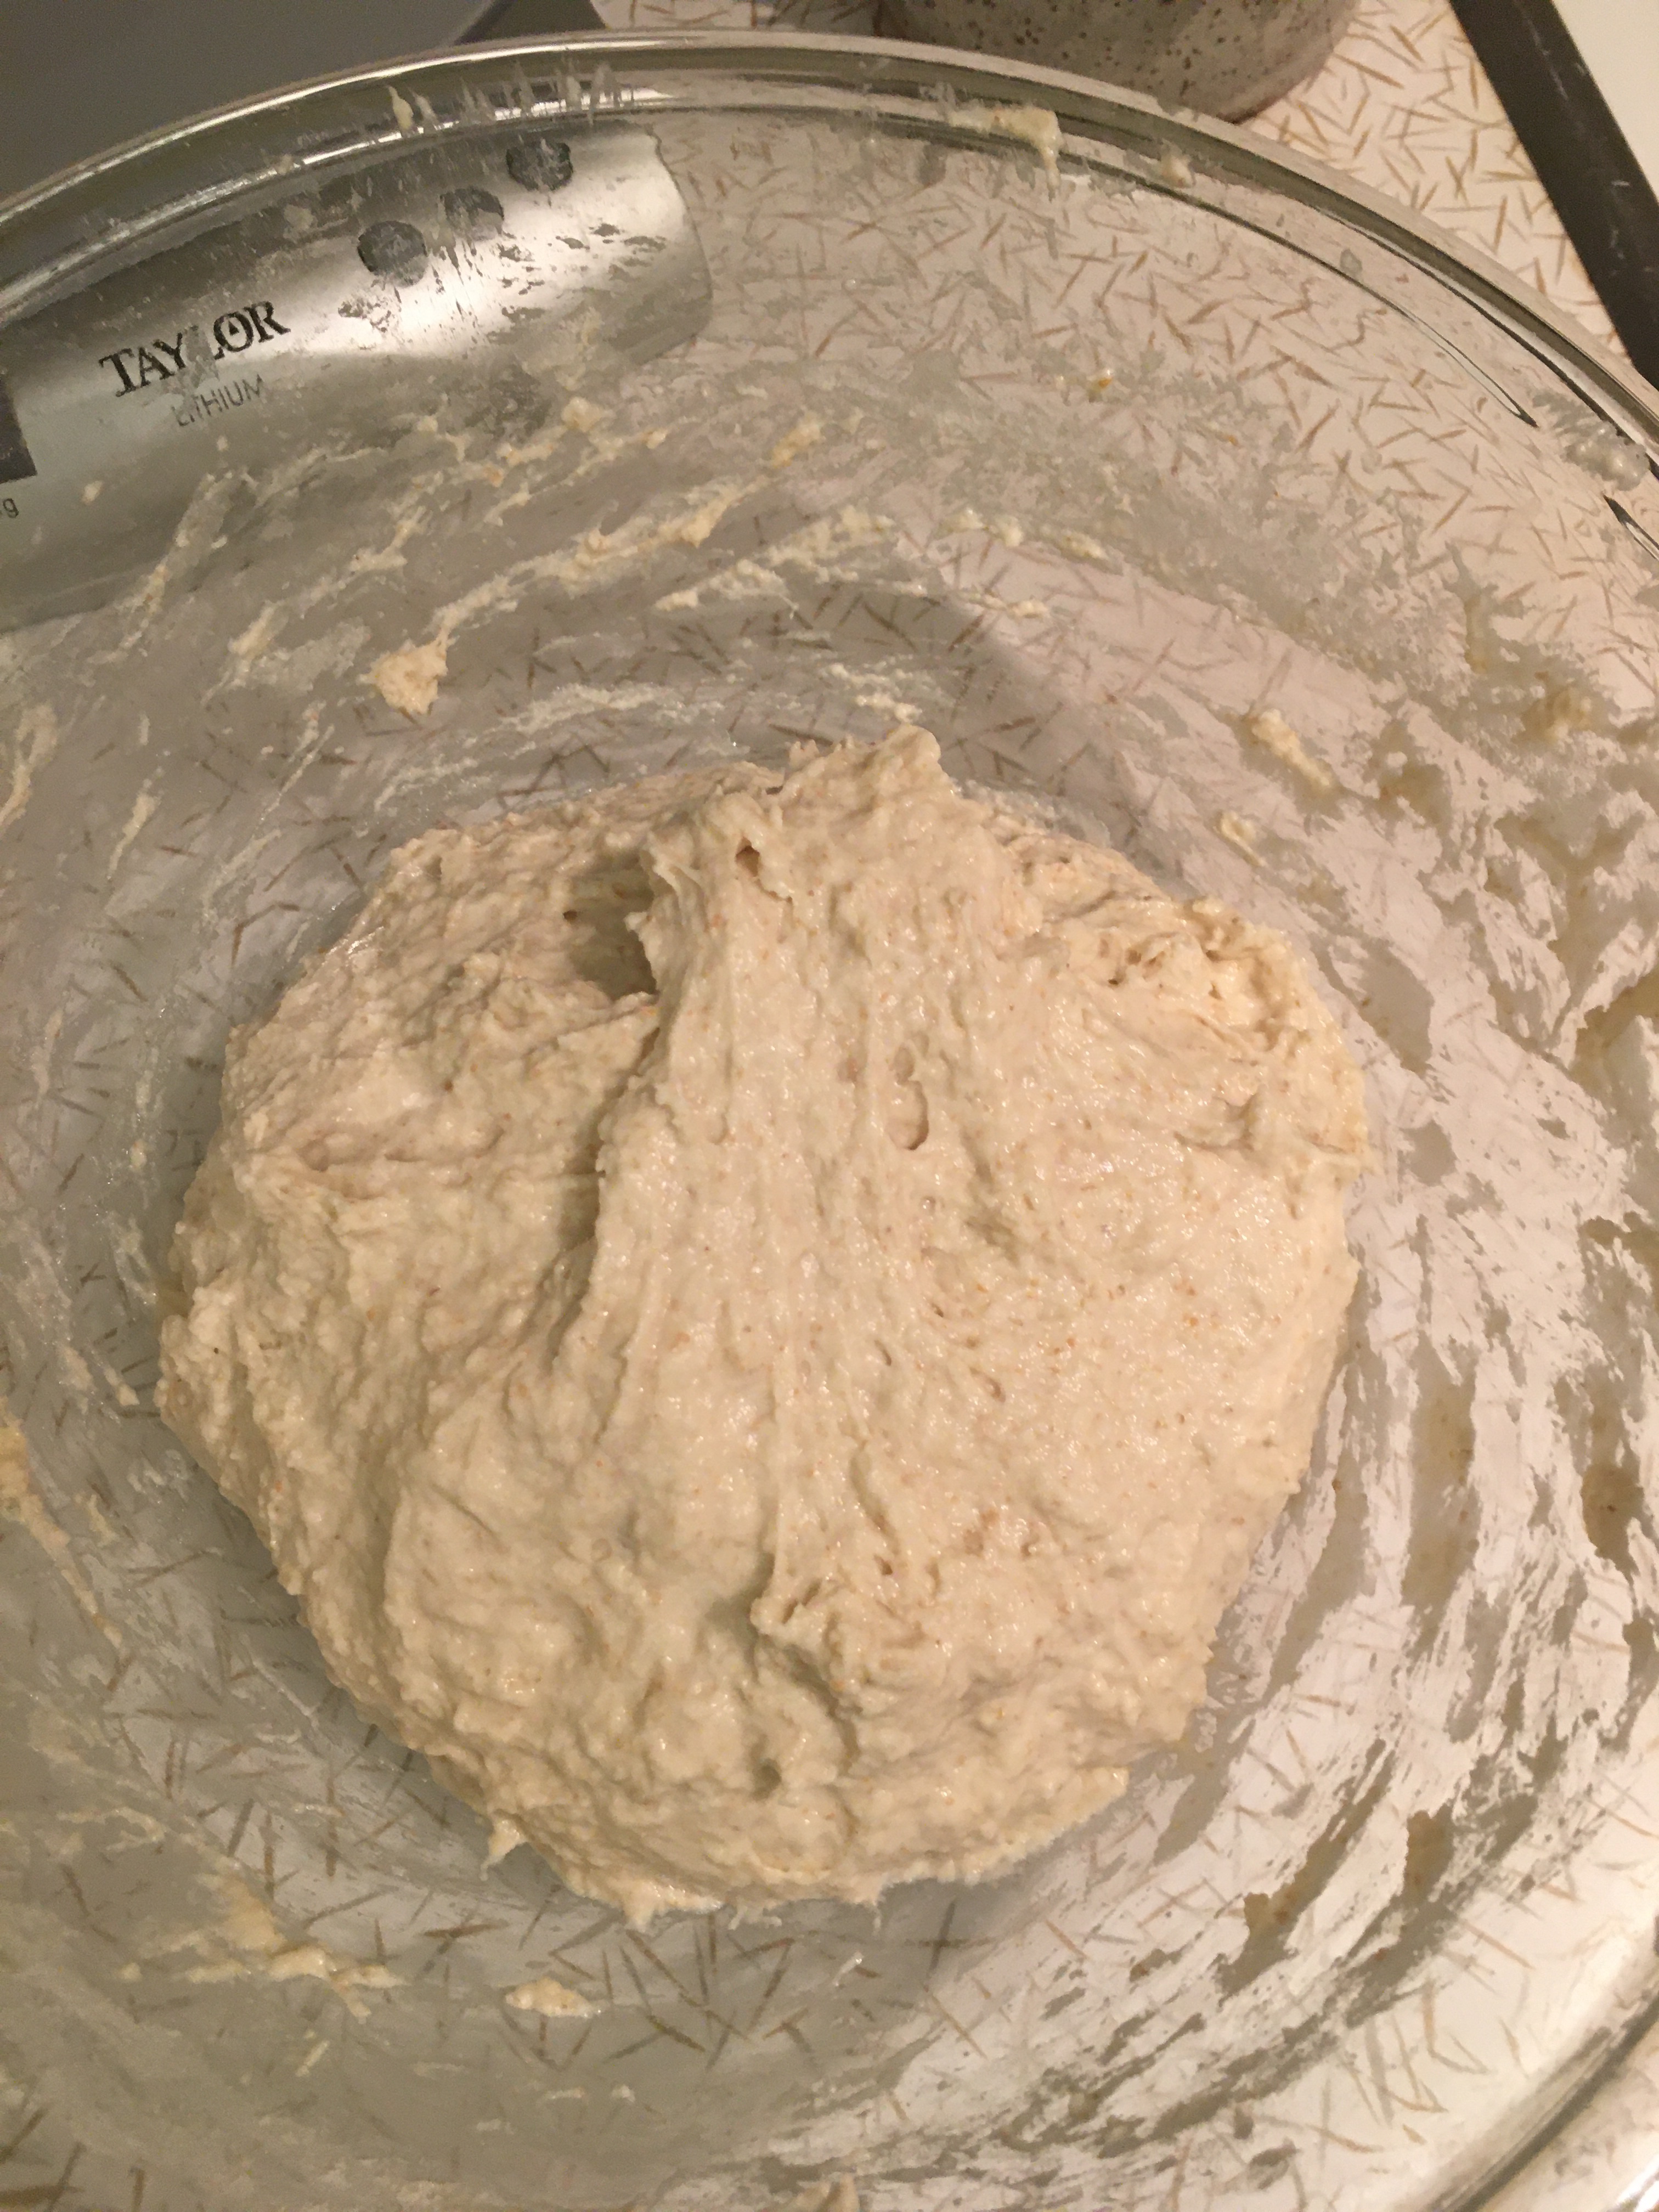
Please don’t forget the salt. Self. Please don’t forget the damn salt. Salt gets sprinkled over the top, and using the tips of my fingers against the bottom of my mixing bin, I “pinch” the salt into the dough.

I remember reading about the method of pinching for dough, but could NOT for the life of me understand the correct way to execute it. But then I also remember hearing someplace else (I swear if I had a memory I could site my sources) that the water pulls the salt into the flour. So my intuition tells me that as long as I “cover my ground” evenly and handle it accordingly, I will be fine. Then I’ll roll the dough onto itself, pinching it with my fingers some more as I go, until it is a single, shaggy looking wet mass. Much like my depressive episodes. And we let her sit and stew in her salty thoughts for about an hour (although lately it’s been 40min) until she’s gone completely slack.

- Fold for structure
Okay, so now the dough is nice and slack again. I want to start pulling on those gluten strands and manipulating the dough to have a structure that will hold onto itself. But this can also be over done, you’ll feel resistance in the dough right before it tears and just doesn’t feel like the same uniformed mass it was a second ago.
As for the folds, we do one for each side of the bin. Using my plastic bench scraper (dipped in a bit of water) I separate the dough from the side of the bin and a little bit from the bottom corner. Then, tucking my hands from each side of the dough, I lift the dough letting it stretch until it pulls away from the bottom of the first side of the bin.
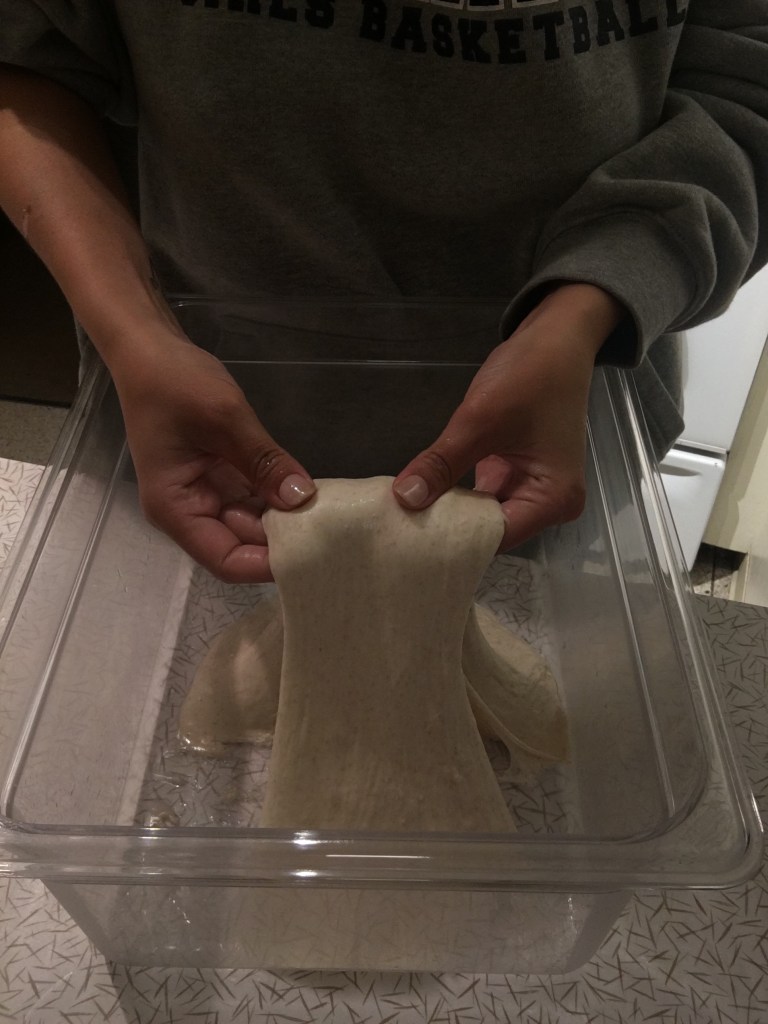
I tuck that half underneath itself, letting the surface area on top of the dough begin to take structure.
I do this for all four sides, sometimes even going around twice, until the dough looks more like a recently fluffed pillow. Then I let her rest and go slack again (another 40min) and repeat the process.
- Bulk proof.
I dunno what to tell you on intuition here other than knowing when the dough is over-proofed. If she sighs (exhales, falls, acts like you hit her when you totally didn’t and she’s exaggerating it wasn’t even that bad) when all you did was move the bin… Yikes. My bitch goes to sleep for about 6 hours after her second fold. And when it’s time to wake up and leave the mixing bin forever, the dough is usually just as bubbly and taught on the counter as it was in the bin a second ago.

- Shaping
So with this dough that’s uniformly structured and wide awake for some handling, we begin to bring more of that structure and shape. On a generously floured surface (I use a tea strainer to sift flour over my dough in the bin, and a little bit more onto my counter) dump the dough out and begin to find a way that works to bring a tight, even, round structure to your loaf. Ultimately the shape.
Some bread recipes will have you do a preshape, and that looks a lot like the folding techniques we used earlier. But the goal of the preshape is the same as the folds, giving the mass structure and manipulating the gluten strands to build the strength and shape of the dough. So, that can also be achieved through scootching the dough along the counter and pulling the surface area of the dough down and underneath itself. I also haven’t the faintest clue how to achieve my goals that way, so I use the fold methods.
BUT for MY recipe, I just do one batch of folding. Starting off with book folding it into thirds, by stretching two opposite sides out and folding them in towards the middle, the second landing on top of the first. Then I roll-and-tuck the now long rectangular dough, pressing each tuck gently so that the dough still holds itself without tearing, until it resembles a smooth sheep with no head or limbs. I couldn’t think of a different comparison. Then I grab my pre-floured bread baskets and dump the little lamb in, belly (seam) side up.

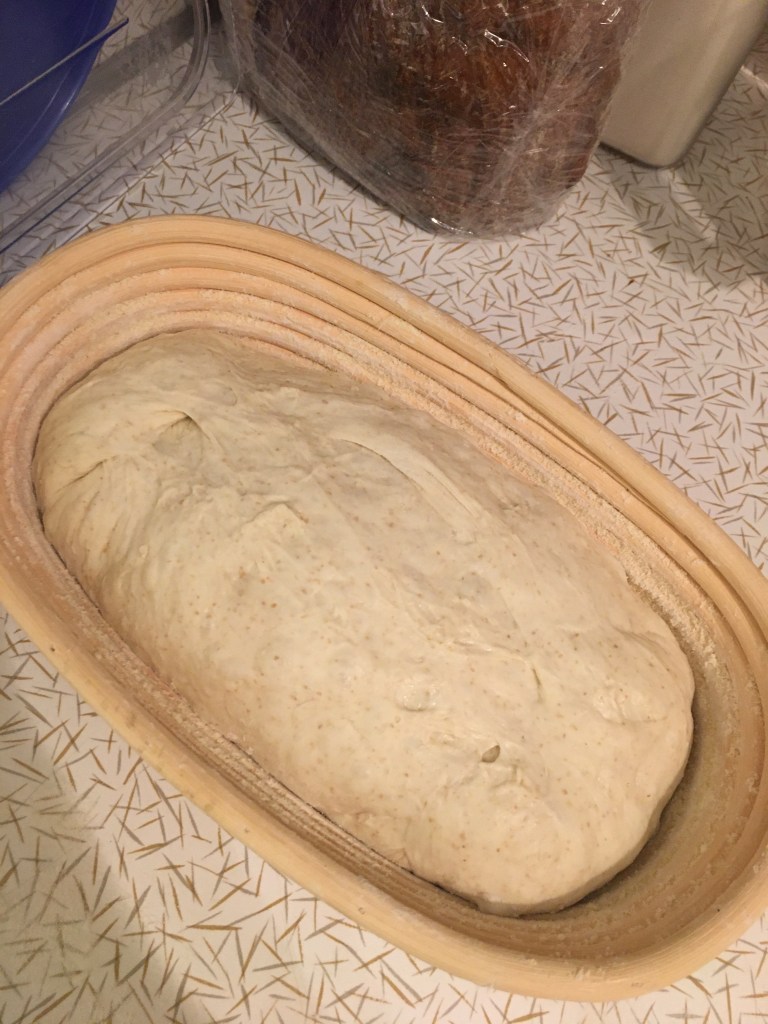
- Proof
The proof after the shape. We just knocked a bunch of air out of our dough, and it still has more “fermentability” in its system, so along comes the post-shape proof. With my dough, it usually takes about two hours for the dough to have enough air left to push back a little when I poke it, but still leave a dent where my finger was. As though it’s as full as it is going to get before we add heat to really expand the air inside. Feels good enough to me.
- Score
My favorite part and the one that I struggle with. Because it tells you a lot about how well structured the dough actually is, how much more or less it could’ve been proofed for… it’s just a whole rollercoaster of emotions after you pull that blade through. ‘Cause if the dough barely reacts/moves/slacks after the cut, you might not have enough structure in the dough OR too much and it tore and has already collapsed and hates you.
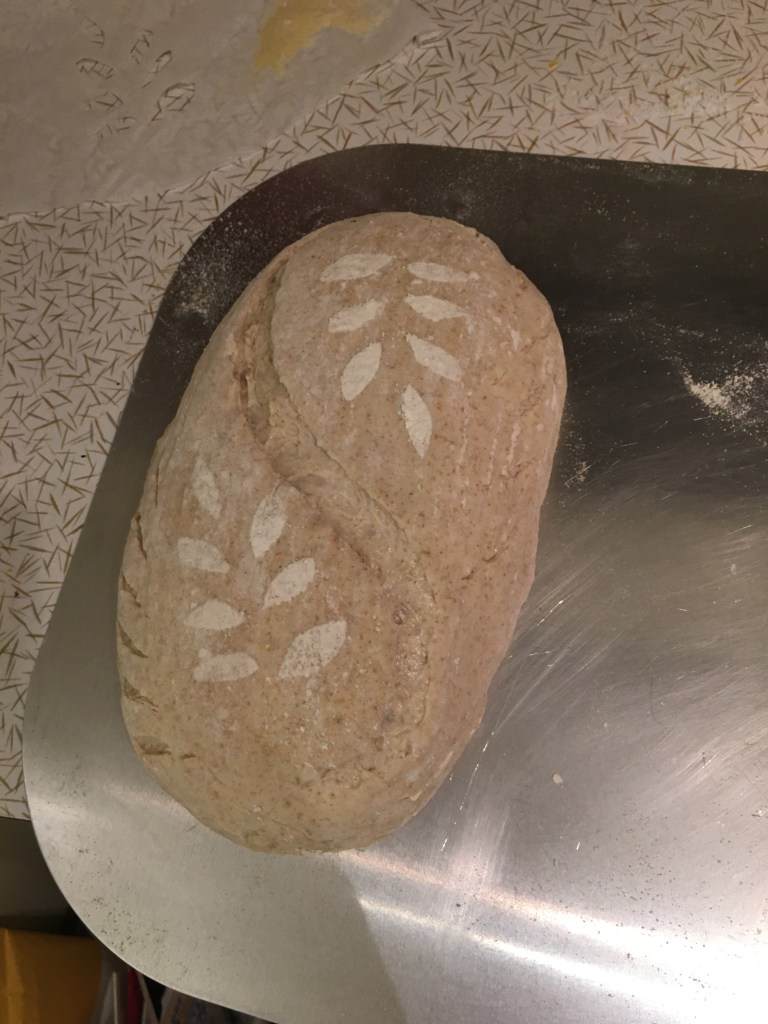
And then there’s the bake part. If the bread busts out the sides, you shoulda scored deeper or added smaller decorative cuts. What about the ear, you ask? Well I’ve been fighting with that one a lot. I don’t feel like it comes from the way you score so much as it is a sign of how well shaped the bread was. It seems as though I get better results for an ear when I have a tighter shape, as though the sheer pressure from all the air bubbles is what pushes that dough out from the center right under the score. Or exactly like that. Anyhoo.
- Bake
Oh to steam or not to steam. We know why we steam, to keep the outside of the dough hydrated long enough to let the dough inside stretch up and out, before letting the crust begin to set. I find that my dough takes about twenty minutes (give or take) to fully rise. This knowledge comes from constantly peeking underneath the hotel pan I put over my loaf until I found a time I was comfortable with to leave it alone. At home I personally haven’t had great results with trying to use actual steam, because it all escapes from the oven through the stove top. I’ve tried covering each coil on top with a pan lid, but no luck. So instead I use the deep hotel pan as a cover for my loaf, and the water that is already in the dough and getting cooked out is used for the steam. I’ve gotten my best springs and ears by using this method.
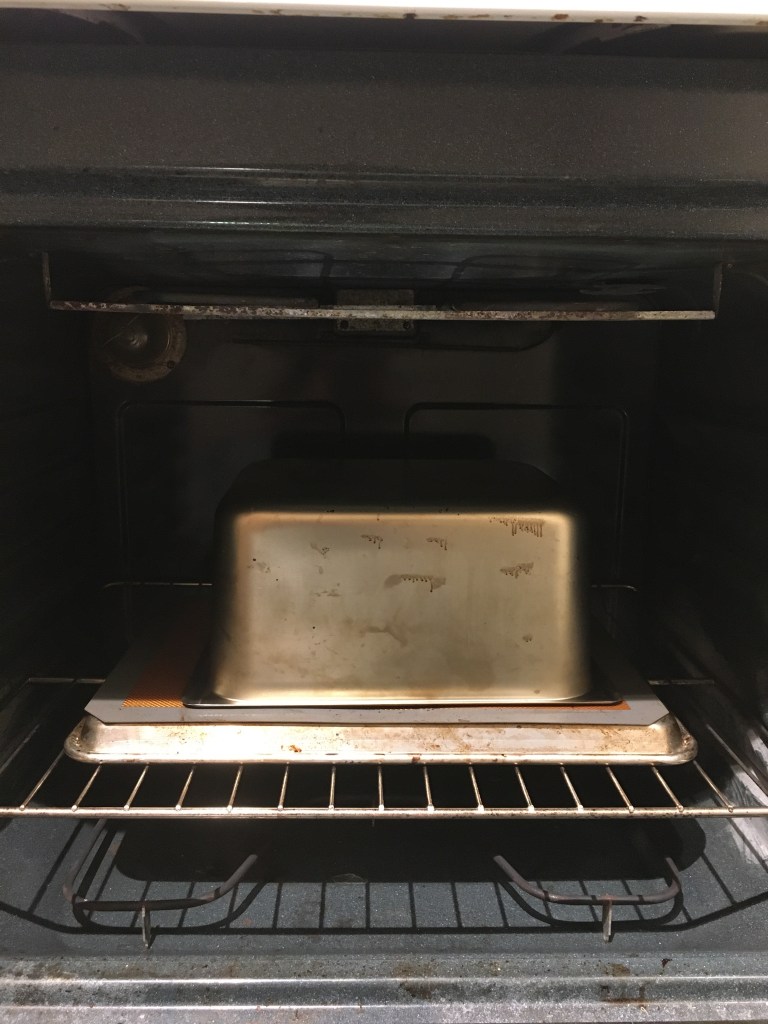
After the steam, the rest of the loaf inside has to finish baking, but I don’t want the crust to get too thick and difficult to cut through. So after I take the hotel pan off the loaf, I lower the temperature and wait for the dark gold to set in on top.
As one of my favorite chef instructors told me “the nose knows.” It takes about another 20-30 minutes, but as soon as I start smelling the bread in my bedroom, I know I have about 5 more minute before it’s gonna wanna come out. And one of my favorite tests is knocking on the bottom. “Hello? Are you done yet?” But usually color is an indicator enough.
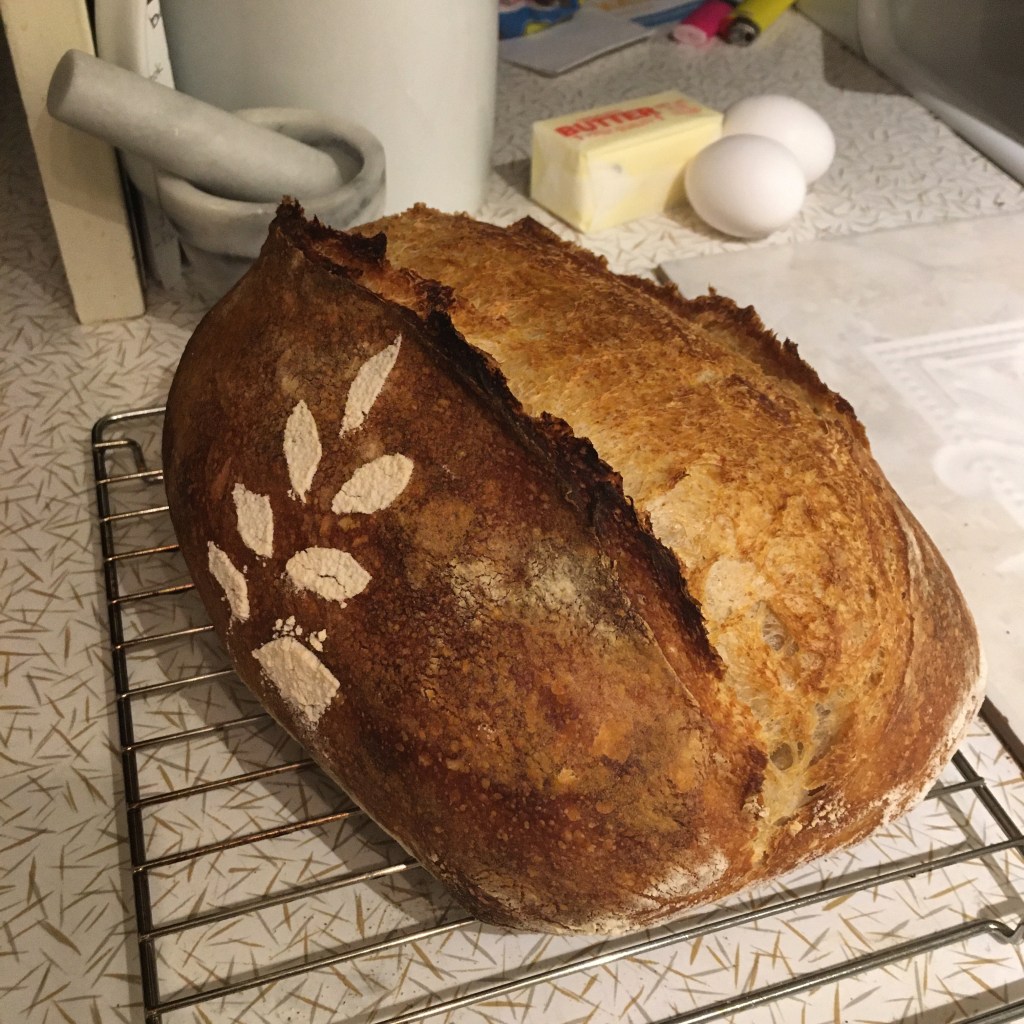
And because we know that hot things are hot, and steam likes to escape, we don’t cut into our loaf until she’s cooled. Mostly 🙂
-Rieu
